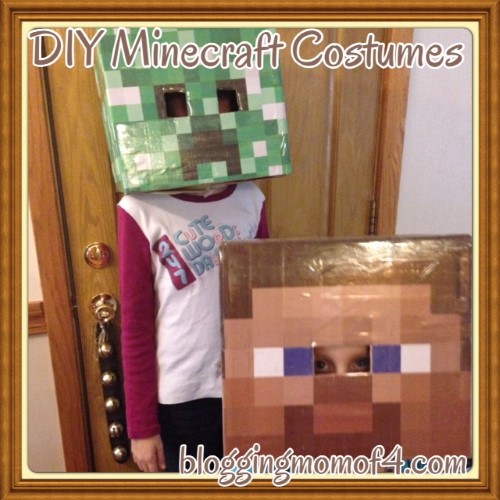
Are your kids crazy into Minecraft? Have they been asking for Minecraft Costumes?
I haven’t seen anything like Minecraft. I, personally, do not really understand the pull of this game but the rest of my family are verging on obsessed. 😉 They do tell me that if I just gave it a try, I would love playing it.
The game, actually, is really good for their creativity. They love building and designing.
I thought we had all of the kids’ Halloween costumes figured out for this year but then last minute my girls decided they wanted Minecraft Costumes. I did see some in store but rather than spend the money, I thought I’d attempt DIY Minecraft Costumes. Why not! And I’m sure that my kids will be using these costumes year round and not just for Halloween.

I picked up 2 boxes 12x12x12 at Walmart under $1 a piece. Then I found printable patterns for the Steve character and for a Creeper.
I did Steve first and had no intentions of doing a creeper but after we made a Steve, my other daughter wanted the creeper. I actually like the pdf printable for the creeper better than the one for Steve. It was a lot easier to put together. But both worked and are super cute.
I’ll add a photo gallery at the bottom so you can see our progression. Click on the pictures to see a larger image. Click off of the image to return to the post.
Here’s the how to:
DIY Minecraft Costumes
1. Grab a 12x12x12 box. Either one close in size from what you have around the house or pick one up at Walmart. I’ve seen others use an 11x11x11 that they got from a FedEx store.
2. Print the patterns in full color. Depending on your printer, you may have to adjust. My printer offered a setting to print in tile form for the Steve pattern. (Make sure you keep the papers in order so that you know how the puzzle fits together. Mine were not in order and it took awhile for me to figure out which order to put them in). The creeper printed out in full sheets.
Here is where I found the patterns I used:
Steve or you can try this one here. The 2nd one is not the one I used but might be easier.
Creeper
3. Trim off any white areas around the patterns. I used a paper cutter from my scrapbooking days. Made things super quick and easy.
4. Lay out your pattern first so you know where each piece will be going on your box.
5. Put the top of the box together. Use packing tape to secure.
6. Using a glue stick, begin adhering each piece to the box. I started with the face, centered it and then worked my way around.
7. Using an exacto knife, carefully cut out spots for the kids to see through. This may be different for each child.
TIPS for our DIY Minecraft Costumes:
- For Steve, there is also ‘hair’ printouts. These will go on the top of the box. For the Creeper, I just printed out extra pieces that I cut and pasted on the top.
- I also used clear packing tape to finish off the edges and any seams. Then I looked up the weather and with the chance of rain on Halloween, I decided to cover the entire box with clear packing tape. It will make it hold up a lot better…especially if we do get some rain.
- On the bottom, I cut off 2 of the flaps and then cut 1/2 circles in the other 2 flaps so that my girls can get their heads in.
- Once we had them done, the next issue was figuring out how to stabilize the boxes on their heads. For a quick fix, I grabbed 2 neck pillows and they put those on before the boxes. It just helps so that the box doesn’t move quite as much.
- Lay out the pieces in the design.
- Use a glue stick to adhere the paper.
- For Steve, it will come in 8 sheets, top half and bottom half.
- We had just a little spot that wasn’t covered. We used a brown sharpie to fill in.
- Steve is done. On to the creeper.
- Steve and Creeper Minecraft Costumes!
My girls LOVE their Minecraft Costumes! And I love that they can wear normal clothes because their heads are costumes enough. 🙂 When you live in a cold weather state, you never know what the weather will be like…whether you’ll need to a winter jacket or a short sleeve shirt. Most of the time, we end up having to cover up most of their costume with winter outerwear.


